
Arduino Micro Joystick Card
Transforming an inexpensive Arduino Micro Pro into a 7-axis, 11-button joystick controller.
Introduction
I've been procrastinating on creating this guide for a while now. I knew that producing a programming sketch and build guide that is accessible to anyone would require a lot of time and effort, and I didn't want to get lost in a never-ending cycle of trial and error. However, this project has been highly requested, especially by people outside the UK who find Leobodnar cards pricey and difficult to obtain with shipping.
In the few days it has taken to understand the Arduino Micro Pro and creating a sketch, several pertinent facts have arisen:
-
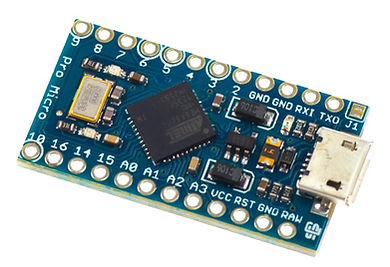
The pinout differs between clones and manufacturers. For this guide to work, your Arduino Micro Pro must look like the picture above.
-
There are 9 analogue axes that can be used. However, I can only get windows to register 7. So this guide will allow you to use 7 of the 9. That is enough for the throttle units (you only need one working trim wheel!)
-
The remainder of the pins can be used as buttons.
Getting Started
Before you can do anything with the Arduino Micro Pro, you must have certain software and libraries installed. Here is my guide to getting you on your way:
1) Install the Arduino IDE software. Download it here:
2) Download the Joystick Library (From the creator MHeironimus) here:
3) In the Arduino IDE:
Select Sketch > Include Library > Add .ZIP Library
Browse to where the downloaded ZIP file is located and click Open.
4) Download my Joystick Sketch and open it, by double-clicking on the file: 737DIYSIM_7AX-11BUT_MIRCO.ino
(It should open up the sketch in Arduino IDE and look like this:

Here is the important part: you will need to turn on or off which axes you desire.
I found that you can not turn all seven axes on without them being physically connected. This causes mass jitter across all axes and multiple axes will move if nothing is connected to the analogue pin.
Decide on the number of axes you wish to connect to potentiometers and use the following pinout diagram to help you wire the correct pins:
Pin Layout
You can see that the first four axes make sense. A0 to A3. But A6 is Pin 4. There is no A4 or A5.
So potentiometers can be wired to pins 4, 6, 8 on the left side.
This gives a working total of seven. The rest of the pins can be used for buttons.
If you know how to write or edit programme sketches, Pin 9 is A9, and Pin 10 is A10. You might be able to get Windows to recognise all nine axes! But for me, this proved futile.

True or False

Scroll down to find this section of the sketch.
Type "true" (lowercase) to turn on the axis
Type "false" (lowercase) to turn off the axis
The text should remain a blue/green colour. If it turns black, you have something wrong.
Only the seven axes with Pin numbers next to them should be selected!
No action is required for buttons.
IDE Board Selection
We now need to select the correct board from the menu:
Tools>Board>Leonardo
I know its a micro but the board architecture is based on the Leonardo.

Port Selection

We now need to select the correct port on the computer:
Tools>Port>Com#
Hopefully, it will auto-detect the correct port for you and display it. If not and you have multiple ports showing you may have to check your device manager to get the correct com port details.
Testing with Windows USB Game Controller
Click the upload button
The computer should complete the upload, disconnect the Leonardo and when it reconnects, it should now be a USB game controller.
In the windows search bar at the bottom of the screen type:
USB Game controllers
The config manager should appear with Arduino Leonardo highlighted.
Select properties.
Calibrate all the axes.
