
Creating Sim Panels
Tips & Tricks

Liteflow or dummy Panels
The illumination of aircraft panels varies based on the manufacturer, with Garmin panels can be illuminated in green, while the 737 panels are in warm white. This feature enables text and symbols to stand out in low-light conditions. In my current aircraft, we use Liteflow panels, which can be more challenging and expensive due to their back-lighting capability. If you are interested in this version, it's important to factor in the additional complexity and costs during the build process.
IMPORTANT NOTE:
When buying panels, it's important to make sure you get exactly what you want. Unfortunately, many people have made the mistake of buying from a cheap online source, only to discover that their panels can't be backlit. Be cautious and do your research before making a purchase.
Introduction
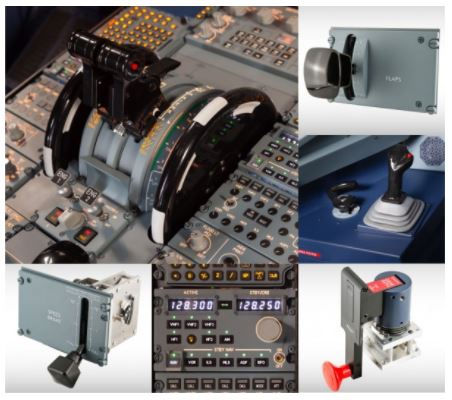
When you first start adding to your sim collection, it's likely you'll become interested in creating your own panels. From the MCP to the MIP and even the overhead panels, you'll need a lot of them. Depending on your skill level, financial status, and time commitment, there are several options to consider. Here are a few possibilities to explore:
1) Purchase the complete package
2) Purchase the panels from a 3rd party such as www.cockpitsimparts.co.uk
3) Create the panels using your own printed stickers
4) Create the panels using a laser or CNC
5) Create the panels using a 3D Printer
Having a replica cockpit with all the components functioning exactly as they do in real life is both impressive and appealing. The added step of realism provided by the panels is significant, and in my case, having a full-blown sim would make for an excellent procedural trainer. The MIP for the 737 is the focal point of the simulator and an ideal starting point.
2) Purchasing the panels
If you're looking for professional-looking panels without the hassle of creating them, I highly recommend checking out www.cockpitsimparts.co.uk. These panels are affordable, visually appealing, and can even be backlit. However, before making a purchase, there are a few things to consider. Due to their growing popularity within the sim community, production delays may occur. Additionally, there are no build instructions, so I suggest purchasing the electrical components simultaneously with the complete package to ensure you're ready to go right away. It may be necessary for you to determine the optimal method for mounting the components within the panels in order to ensure the panel's full functionality.

1) Purchasing the complete package
If money is no object, and you want a plug and play option that looks great, works amazingly and you will be the envy of most simmers worldwide, head over to:
https://flightdecksolutions.com
Their stuff is gorgeous and replicates the operation almost exactly to the real aircraft.
FDS are just one major company, but there are many others to chose from.
3) Creating Your Own DIY Panels
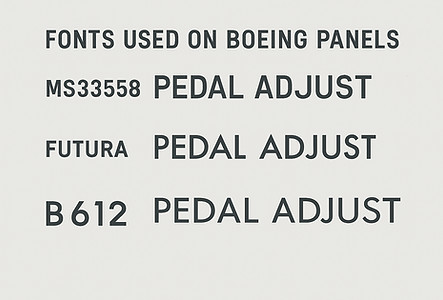
The Fonts Used in Boeing Aircraft Panels
Boeing aircraft panels, particularly in the cockpit, feature fonts chosen for their legibility and reliability under demanding conditions. Depending on the panel, the font can vary.
MS33558: The Military Standard
One of the most widely recognised fonts in aviation is MS33558, a sans-serif typeface developed under U.S. military specifications. It’s designed for maximum legibility on instrument dials and indicators, especially in low-light or high-vibration environments. MS33558 is often used in military aircraft and has found its way into Boeing panels, particularly in legacy systems and simulator builds.
You can find and download a free MS33558 from font repositories like wfonts.com.
Futura: The Civilian Favourite
While MS33558 dominates military applications, Boeing’s commercial aircraft often feature Futura Medium, especially on pedestal radios and communication panels. This geometric sans-serif font is known for its clean lines and modernist design, making it ideal for quick recognition and minimal distraction.
B612: The Modern Alternative
Although not used by Boeing, the B612 font family deserves mention. Designed specifically for aircraft cockpit screens, B612 is an open-source font optimised for degraded visual contexts. It’s gaining traction in digital avionics and may influence future cockpit typography.
4) Creating panels from printed stickers

The cheapest and simplest way to create your panels is by using an inkjet/laser printer to print the panel design onto white gloss self-adhesive paper. In effect, creating a sticker. This is then placed onto an easy material to work with, such as 3mm MDF, hardboard or plastic sheet. The holes are then cut to support the components.
They're not usually back-lightable, and produced effect can vary. But many simmers start this way, especially for the 737 forward overhead. A good youtube video of sticker design can be found here.
5) Creating panels using a CNC/Laser machine

Utilizing a laser or CNC machine allows you to produce personalized panels that align with your unique preferences. This way, you aren't restricted by pre-existing designs and can bring your ideas to life.
The general procedure is used to create most liteflow panels:
1) Start with a White 3 or 5mm Opaque acyrilic sheet. Place it onto the Machine bed.
NOTE:
It must be opaque white so the lettering shows when the panel is not backlit in daytime operations. Many people use transparent clear acyrilic, but the text is not visible when the lights are off.
6) Creating panels using a 3D Printer
2) Use the CNC/laser machine to cut the orifices and outline as shown. I remove the plastic protective film from the face side of the plastic for both types of machines.
NOTE:
The panel placement needs to be recorded so it is placed in the same position for engraving. I use the three holes for screws to help line up the panel again.
I do not change the home point of the panel throughout the whole process. For My OMTECH 60W laser, I use 50% power and a cut speed of 5mm/s.


You can mask off the back to ensure the backside remains unpainted if the protective film is in poor condition or missing. I also like to raise the panel off the surface so that any paint doesn't make the panel stick or run under it.
Once the primer layers dry, apply the expensive RAL 7011 top coat.
If you plan to use a laser, it is crucial to make sure that the paint is fully cured before proceeding with engraving. Once the paint is dry, there should be no flames resulting from the laser. This will prevent any residue from being left on the painted surface after laser engraving.


4) Carefully place the panel back into the machine in the same home position. Then, choose the option to engrave text.
I utilize a 3.17mm chamfer bit for my CNC machine that features a 60-degree tip. The crucial factors for success are the feed speed and depth of the cut. To ensure optimal results, I suggest creating a test piece beforehand to determine the appropriate settings. If the speed is too fast, the plastic will melt onto the tip, causing a mess. Conversely, if the speed is too slow, the text will resemble something created by a three-year-old.
For my laser, I use 150mm/s at 30% Power and cross hatch fill.
5) Create the back panel from 3mm clear/Transparent acyrilic. Use the CNC/Laser to cut the orifices and outline. Paint the edges with grey paint. This will allow all the light through to the face panel. I use the laser to score the protective film making it easy to remove where it is no longer needed and producing a perfect line.
6) Place the back panel and face panel together.


7) Add the remainder of the components. Use 12V led strip lights (warm white for 737) behind the panel. These will light up all the engraved parts and can be dimmed if required.
The simplest and easiest way to create panels and parts at home. A $200 machine such as the Ender 3 will do the job. To create panels on simpler machines, it is normal to print in dark grey, and then use the pause printer at layer height. Switch the roll to white, and press continue to print the text layers. The panel should look pretty good from these results alone, albeit it wont be backlightable.
With a machine like the Bambu labs P1P or X1 with AMS (automatic Material System) this makes the job a single button press and a 1/3 of the time.
You can make light flow panels with limited results using clear filament for the panel and switching to white for the text. This will then need several thick layers of high build promer applied to hide the light. Once the panel is dry, sand the surface of raised text.