


Last Updated: 11/JUL/2023
Building your first Sim....
Let's start!
Hi, I'm Karl—an avionics and mechanical Licensed Aircraft Engineer (LAE). One evening in Brunei, while exploring the endless rabbit hole of YouTube, I stumbled upon the channel "Build A Boeing." After watching Peter’s videos and realising that you could take the simulator off the screen and make it interactive in real life, I was hooked. The next morning, I excitedly shared my discovery with my wife, Helen, and made a bold decision—I was going to build my very own Boeing 737 cockpit. And so, my journey began.
Why the 737, and why build a simulator?
At the time, I was studying to become an avionics engineer and lacked a deep understanding of EFIS (Electronic Flight Instrument System). I realised that constructing a fully functional cockpit would be an invaluable hands-on experience, helping me grasp the complexities of aircraft systems for my exams. Additionally, I’ve always preferred the tactile nature of Boeing's yoke and controls over Airbus’s sidestick, reinforcing my choice.
Choosing the right simulator software
No matter which aircraft you choose, ensuring the simulator software is fully interfaceable is crucial. There’s little point in building a replica cockpit only to discover that the software cannot replicate the aircraft’s real-world functionality.
For the Boeing 737 & A320, ProSim is the gold standard—it offers study-level logic and an accurate reproduction of real aircraft systems. A step down is PMDG 737, which I estimate allows around 70-80% of cockpit functions to be interfaced. While some enthusiasts pursue simulators for aircraft like the Boeing 787, 767, or 757, the current software options for these models still fall short compared to the standards set for the 737 and A320.
Building a cockpit on a budget
You don’t need deep pockets to pursue this passion! I created my website to document my journey of constructing a simulator on a tight budget, proving that financial constraints don’t have to be a barrier. While having more funds can certainly make the process easier, it is by no means a requirement.
Through this platform, I’ve connected with a diverse community—from perfectionists with limitless budgets to newcomers eager to add realism to their home simulators or refine their DIY skills. My focus is on the latter group, helping hobbyists and aspiring builders bring their vision to life without breaking the bank.
Can you build a sim on a small budget?
Certainly! Let's take a trip down memory lane and discuss my first sim, Sim 1! You don't have to start with a complete Boeing 737 cockpit. Rather, begin with smaller projects such as 737 MCP or radios. While the throttle assembly is challenging, it's an excellent build project! Focus on realism where it matters and as needed. If you decide that this is your hobby, you can expand with various systems as you go. Unless you're confident and have saved money, avoid jumping straight into building a full-size cockpit. It can be expensive and very time-consuming at any level.


Initially, I started with the parking brake light and became fascinated with controlling hardware with software. The introduction of the MCP was a significant advancement, but I must acknowledge that it was also quite challenging. Unfortunately, the necessary resources were not readily available to facilitate the process. This was a huge leap forward for me! However, it took several months to get the initial design to work. If you plan on starting with the MCP, I recommend checking out the DIY MCP v7. It is specifically designed to be easy to build and wire. It comes with a dedicated build guide and youtube video.
Fortunately, I could obtain the wood/timber and monitors for Sim1 at no cost, which was a great starting point. I used my desktop computer to run PMDG, a cheaper but less comprehensive software package for the 737 simulation systems. It's a great budget option. My total cost for building Sim1 was only $600, but the quality reflected that it was a DIY homebuilt project. The majority of the expenses were for Arduinos and electrical components. Luckily, MobiFlight software by Sebastian made the build a million times easier. This software interfaces with the inputs and outputs of electronic hardware to the flight sim software.
I affectionately refer to Simulator 1 as the "baby sim". It was downsized to fit in our previous home, with the captain's side being full size while the F/O side was omitted. Unfortunately, this led to its eventual destruction despite being a remarkable project. I regret having to take it apart for parts to build sim 2.


I encountered an issue with Sim1 when I invited friends to try the simulator. I would set up a scenario where the 737 was at an altitude of 2000 meters and prepared to land, but my friends lost interest after a few attempts because they kept crashing. It would be awesome to have a dual-control cockpit to help guide them onto the runway.
As I progressed to Sim 2, I aimed for a more realistic experience without going over budget. Collaborating with friends who work on Boeing 737s, I acquired photos and dimensions necessary for the project. These resources became the foundation for the plans, designs, and guides available on this website today.
However, despite the stunning appearance of the Sim 2 cockpit, the project ended up as a failure when it came time to assemble the parts. Despite nearing completion, nothing seemed to fit, and I wasted significant time and money. Overnight, I transitioned to Sim 3.
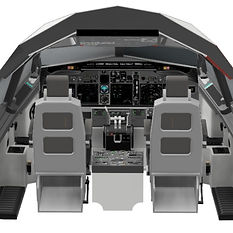
SIM 3 - The Dual Seat Beast

I chuckle now at how sudden the decision to start over was. However, despite the quick decision, it took another eight months before Sim3 began construction.
Six months of my life were spent learning Fusion 360. At least 10 hours a day non-stop through weekends. I became obsessed with designing a whole CAD cockpit, from the smallest screw to the complete design. It completely transformed my approach to building anything! I've realised that CAD/CAM is an essential tool in the design process, as it allows me to perfect my simulations before even beginning the physical build.
I've learned that if it doesn't fit in CAD, it won't fit in real life. I faced a challenge with the glare shield and side window meeting points, which took weeks to resolve. There were moments when I felt like giving up, but I persisted and woke up each morning ready to tackle the problem again.

I'm proud to say that we have successfully built Sim 3, which boasts a beautiful and functional design. It was much easier to build than Sim 1 & 2 with the trim around the base window structure, which is always the most complex part of the process.
For Sim 3, I decided to prioritize practicality over ultra-realistic external features. This approach makes it much easier to add wires or components, as the internal cockpit closely resembles the real thing. At the same time, the exterior design is optimized for ease of construction and maintenance.
During the sim build, I had a great realization when I discovered a unique approach to window construction. The design allows for a layer-by-layer build, similar to a 3D printer, which includes the trim. It's a clever and efficient method.


Is Sim 3 cheap?
In my opinion, I have been pursuing this hobby for almost ten years now. However, in retrospect, the cost of Sim 3 has exceeded $4000, which would not be received well by my wife, Helen. I find this amount astronomical, and I never intended to spend this amount.
I ended up with a Boeing 737 Sim that is not yet perfect, but I am so happy with it. Some have pointed out that my measurements are 5mm off over 2400mm. Nevertheless, I plan to improve this flaw when I obtain my next job at Boeing and can build the sim in real life.
It is not solely the cost of the sim that has made it more expensive than Sim 1. In addition, the sim requires 23 Arduinos, each costing $6.99 (back in 2015, now they are around $20), which was purchased gradually as I needed them.
Regarding the question at hand, "Is Sim 3 affordable?" After reflecting on my five years of work on Sim 3 and witnessing it come to life, I can confidently say it is cheap! The sensation of stepping into the 737 cockpit is amazing. This option is much more cost-effective compared to other hobbyists who insist on using only OEM parts and require an actual 737 cockpit as the framework. To embark on their path, you would need to invest at least $40,000 to construct a functioning simulator - a hefty price tag.
Conclusion
Engaging in simulation aviation is a wonderful hobby for enthusiasts and pilots, as the graphics and software improve in realism and capability each year. While it depends on personal perspective and circumstance, it's worth noting that sims can offer a similar experience to the real thing at a fraction of the cost. My advice to anyone starting is, to begin with small steps and aim high.
Incorporating a 3D printer into your sim building toolkit is an excellent idea, as it allows you to create cockpit panels, parts, and customized components that cater to your specific requirements. Most beginners start by constructing their cockpits using a 3D printer and eventually progress to using top-notch parts as they gain more experience and their budget changes.
However, be warned that you may end up completely engrossed in aviation like me!