This DIY KIT is the most comprehensive one available on this site. The Boeing 737 VHF Nav Panel is the first of many panels to undergo an overhaul to incorporate the latest designs, production techniques, and ease of assembly. Reaching this CAD and PCB design stage has been an epic journey lasting nearly a decade.
The design of this panel is tailored to sim builders of all levels and makes it as easy as possible to create a good-looking radio. There are numerous options available to suit your budget.
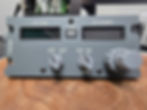
The panel has laser-engraved panels and purpose-built 3D-printed parts designed to fit around the electrical components and PCB. It is intended to be easy to build, and the backlighting is impressive.
All SMD electrical components, including the chips, resistors, and capacitors, are pre-soldered. The only components that require soldering are the six-digit displays, a dual encoder, and two tactile switches. All components are through holes, making assembly a breeze with a soldering iron and large holes. The panel is designed to work with an Arduino (not included) and Mobiflight. The 16-pin connector at the rear can be wired to the Arduino to provide the interface. No additional external resistors or components are necessary.
The unit can be powered directly from the Arduino via VCC/5V or an external power supply. If you choose to use an external power supply, ensure the grounds from the power supply and Arduino are connected. Moreover, ensure the polarity is 100% correct, as there are no reverse-current diodes. Having them would lower the operating voltage of the 7-segment display. For more information, please refer to the Build guide. This will show how to connect the radio to an Arduino or BOB.
12V DC is required for the backlighting, as it has separate inputs for +12V and 12V ground.
The following options are available in more detail:
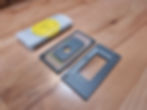
The Panel Set
These panels consist of three layers of acrylic material, painted and laser-etched. The base panel is 3mm thick, and the mid-panel is 2mm thick; both are clear acrylic. The face panel, which is 3mm thick and white, is painted grey and laser-engraved to allow light to flow through the text. While the panel can be 3D-printed, the luminance and quality of the Lite flow text will be reduced.
Note: This applies only to the three painted and laser-engraved panels; 7-segment displays are not included.
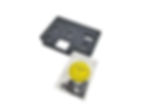
The PCB
This is provided by itself. You will need two 6-digit 7 Segment displays, A 6x6 tactile LED and a 12 x 12mm tactile switch.
The PCB and electrical components
A PCB (printed circuit board) that includes all the necessary electrical components to complete the build. However, it is important to note that you may purchase the electrical parts separately from Aliexpress at a much lower price than what is available here. This option is suitable when you require all the components simultaneously with the PCB and are guaranteed to be compatible on arrival. (Includes x2 digit displays, Dual Encoder, x2 tactile switches)
The Resin Knob Set
Highly detailed and designed to fit perfectly in the parts, the primed and painted parts are ready to be fitted. These are optional, as they can be printed at home. This set includes the dual encoder knobs, the TFR button, the test button, and the screen frames.
The Complete DIY set
Everything you need to build the complete unit in one box. The only required part is the x4 mounting screws (4mm diameter) for the Dzus fasteners to attach the panel to your sim. They are omitted because I have no idea what length your sim would require.
top of page

From £9.11Sale Price

Related Products


bottom of page